Madder from powdered roots of Rubia tinctorum was the powerhouse red dye throughout medieval Europe and the Middle East. Madder has well-known affinity for protein fibres (wool, silk) and turns out to be great for leather too. This is a two stage process: mordanting then dyeing. Pretreating with a mordant – a metal salt – ’fixes’ the colour onto the fibres. Choice of metal also affects the final colour, alum (potassium aluminium sulfate) gives the brightest shades – naturally occurring outcrops in Anatolia and other places have been exploited for dyeing since the dawn of history.
The dye bath requires some heating which is not good for leather, so beware of shrinkage, distortion and hardening – this also depends a great deal on the type of leather and what part of the animal it’s from (firm leather from the back, butt and shoulders keeps condition better than stretchy belly and limbs). Overheating will also dull the dyestuff. 60 – 65 degC seems to be a good trade-off – you could go hardcore prescientific and tactile to judge this, but I used an adjustable warming tray and thermometer.
Ingredients
Amounts below are ample for about 100g dry weight of leather, adjust as required. The bath should be roomy enough to let items to move around easily and there must be enough liquid to cover them. Avoid copper or iron containers or utensils, they may cause ‘off’ colours (I used glass or alfoil baking pans). Madder dyeing needs ‘hard’ water or a substitute source of calcium – antacid tabs are convenient; and a touch of cream of tartar (a.k.a. salts of wine; potassium bitartrate) gives brightest reds.
Mordant (2% alum): Alum 20 g; cream of tartar 4 g; 1/4 “Rennies” antacid tablet (~0.32 g, crushed). Dissolve in 1 litre of warm water.
Madder dye bath: Prepare just before you are ready to dye. Cover 50 g of powdered madder root and 1/4 “Rennies” antacid tablet (~0.32 g, crushed) in 1 litre cold water. Heat to 65 degC (lightly steaming), then hold 1 hour stirring occasionally. Allow to cool to 60-65 degC, ready for use. Do not filter.
Procedure
1. Soak your leather pieces in the mordant solution for 1 hour or longer (even overnight). Move them around occasionally. Remove leather when you are ready to begin dyeing.
2. Meanwhile, prepare your dye bath as above, and stabilise temperature at the recommended 60 to 65 degC – covering it with a lid will help.
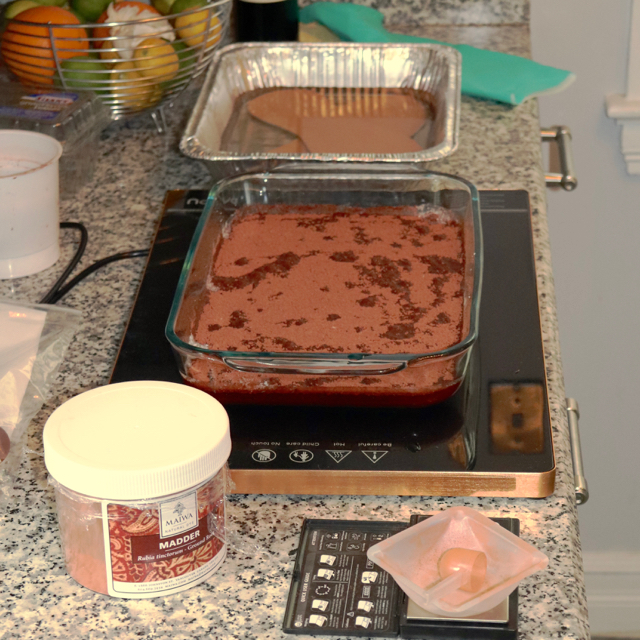
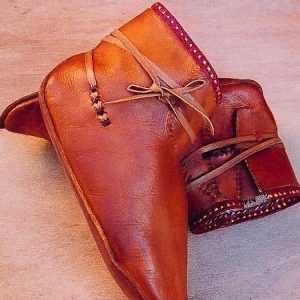
Dye bath on the go: looks like borscht and smells funky! Some shoe soles mordanting in the background.
3. Add the leather. Move it around, turn it over for the first few minutes, and every 20 minutes or so thereafter. Push under any part that isn’t submerged.
4. After 2 hours, turn off the heat. Do not remove items until the bath has cooled to room temperature. Take out items and, using old towels, sponges or the like, gently press out excess liquid and wipe off any madder crud stuck to the surface.
5. Allow to air dry. Once fully dried, brush off remaining debris and treat with the leather dressing of your choice: I use a paste of olive oil & beeswax (4 to 1: warm gently to dissolve) with a few drops of clove oil to keep off the mould.

Result – glorious! Note: I made ‘tunnels’ for stitching in these soles before dyeing in case it made them so hard or brittle that the awl would tear them up. This 4mm thickness veg tanned cattle hide did get a bit stiffer, but had very little shrinkage in the end though.
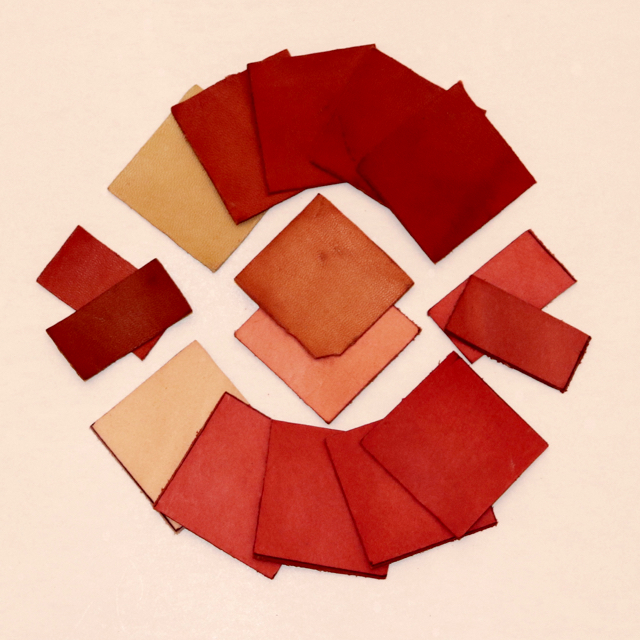
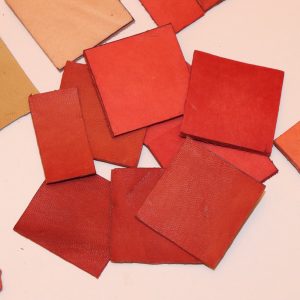
Test squares – upper fan goat hide, lower fan cattle hide. After alum treatment; then 1, 2, 3 & 4 hours dyeing. Centre – same hides dyed 4 hours without using alum mordant. Left and right – dyeing ‘oxblood’: After 1 hour dyeing the madder bath was ‘saddened’ with a teaspoon of iron solution, half the piece was returned for 15 min.
Dye agents, and inspiration from maiwa.com